DYNAMIC ACCESS TO JEAN ZAY GPU CLUSTER
Date: 15/11/2021
Authors: Lisa Lam
Keywords: jean zay gpu genci cluster dari
See this page to quickly get started on Jean Zay for AI users.
Info
Master 2 students completing an internship can also request and have access to Jean Zay. If the internship is followed by a thesis, a new request is necesssary to the transition between Master 2 student and PhD student for the same person.
Warning
For people of French nationality, it takes about 3 weeks to get access to Jean Zay after requesting it. For people of other nationality, it can takes several months.
Info
To access Jean Zay GPU cluster, you first need to request GPU resource hours.
3 different access types are available:
| Access type | Intended for? | When to apply? | For how long? |
|---|---|---|---|
| REGULAR | Important need of computing hours | Twice a year | 1 year |
| PREPARATORY | Small need of computing hours, < 50,000 h CPU and < 1000 h GPU | Throughout the year | 6 months |
| DYNAMIC | Researchers wishing to develop algorithms in Artificial Intelligence <= 10,000 h and <= 48 GPUs |
Throughout the year | 1 year |
Warning
The results obtained should be published at the end of the allocation period when applying to the regular access. However, there is no obligation of publication for the dynamic access, if the number of GPU hours requested is less or equal than 10 000 hours and if the simultaneous use is less or equal than 48 GPUs (4 GPUs x 12 nodes).
Warning
If you publish the results obtained using Jean Zay computing hours, you have to mention Jean Zay in the acknowledgment section (see more details here).
Warning
In this documentation, we will only present the dynamic access.
1. Requesting dynamic access to Jean Zay
You can watch here a video (in french) that presents the overall procedure.
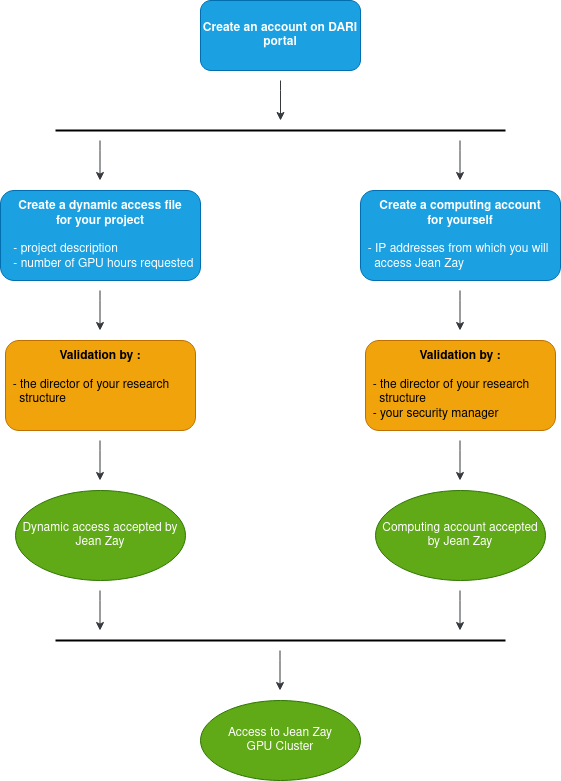
1.1 Creation of a user account on the DARI portal
Follow the instructions on this page to create an account on the DARI portal.
1.2. Creation of a dynamic access file
Info
If you work in a team, only one member needs to create a dynamic access file. The other members will simply attach their computing account to the dynamic access file and can therefore skip this step.
You will need to provide in particular:
- a description of your project (100 characters minimum)
-
number of GPU hours you wish to use.
If the number of GPU hours is more than 10,000 h and/or the simultaneous use is more than 48 GPUs (4 GPUs x 12 nodes), your request will be assessed.Warning
There is no obligation of publication for the dynamic access, if the number of GPU hours requested is less or equal than 10 000 hours and if the simultaneous use is less or equal than 48 GPUs (4 GPUs x 12 nodes).
-
software needed to run your code. Main software (Anaconda, PyTorch, Tensorflow, etc.) are already installed.
Follow the instructions on this page to create a dynamic access file.
Warning
To finalise your dynamic access file request, you will need the validation of the director of your research structure, as recognized by DARI. The validation procedure starts by an e-mail being sent to the director that invites him to follow a link. We strongly advise you to notify the director of your procedure otherwise the validation might stagnate.
1.3. Creation of a declaration of computing account
Computing account is a Unix account used to log in to the Jean Zay super computer. You will need to provide in particular :
- IP address(es) of the machines from which you will access Jean Zay. For security reasons, it must be institutional IP addresses (e.g. Ciclad or HAL IP address, see table below). You will still be able to access Jean Zay from your local machine (see more here). We suggest you to pick one or more addresses from the head nodes of the IPSL clusters.
- 8 characters password that will be necessary during your first connection at Jean Zay
- security manager (name, e-mail address, phone number)
Follow the instructions on this page to create a computing account.
Warning
To finalise your computing account request, you will need the validation of both the director of your research structure and your security manager, as recognized by DARI. The validation procedure starts by an e-mail being sent to the director and the security manager that invites them to follow a link. We strongly advise you to notify them of your procedure otherwise the validation might stagnate.
1.4 Validation of your dynamic access file or computing account request
After sending your request of dynamic access file or computing account, the director of your research structure and yourself need to sign the declaration. For the computing account you will also need the signature of your security manager.
- For those who belong to the Education-Research identity federation (CNRS, Sorbonne Université, etc.), the signature will be made electronically via a link received by e-mail.
- For those who do not belong to the identity federation (e.g. students), you must print, sign, scan and submit the request on the portal.
Warning
It is important that you notify them of your procedure. It is essential to have their signature otherwise your request will not be finalised and stall.
1.5. Attaching a computing account to a dynamic access file
Members wishing to attach their computing account to a dynamic access file have to send a request via the DARI portal, which has to be accepted by the project manager (the one who created the dynamic access file).
Info
You can attach your computing account to several dynamic access files.
Follow the instructions on this page to attach your computing account to a dynamic access file.
2. First connection to Jean Zay
2.1 Initial password
You will need an initial password to connect to Jean Zay for the first time (more details here). The initial password is the concatenation of:
- the password received by e-mail after your computing account has been created
- the 8 characters password that you must have provided during the computing account request
Example:
- password received by e-mail, e.g. Abcdefghijklmn
- your 8 characters password of the computing account request, e.g. 12345678
Then the initial password is Abcdefghijklmn12345678
Warning
The first connection is only to change the initial password. You will need to wait between 12 and 24 hours before using your "actual password" in order for your declared IP address(es) to be associated to your account.
2.2 Connection to Jean Zay
- Connection to Jean Zay is done using SSH protocol (see here and here) for more information.
- See here on how to access Jean Zay from a non registered machine by proxy jumping.
- See here on how to configure a config file to make SSH connection easier.
3. Using Jupyter Lab/Notebook on Jean Zay
Info
Using Jupyter Lab/Notebook on Jean Zay requires to have access to a web browser on the registered machine. If not, you can display the Jupyter Lab/Notebook to your local machine by completing some additional steps.
3.1 When having access to a web browser on the registered machine
Follow the instructions on this page.
3.2 When having no access to a web browser on the registered machine
If you do not have access to a web browser on your registered machine, you can display the Jupyter Lab/Notebook to a local machine by completing some additional steps.
-
In a terminal on your local machine, connect to Jean Zay by proxy jump using a machine which IP address has been registered on Jean Zay, then open a Jupyter Lab/Notebook session. An URL and a password will be displayed. Replace
<your_login_proxy_machine>,<proxy_machine>and<your_login_jean_zay>by its meaning.ssh <your_login_proxy_machine>@<your_proxy_machine> # connect to your proxy machine ssh <your_login_jean_zay>@jean-zay.idris.fr # connect to Jean Zay module load pytorch-gpu/py3/1.8.1 # load an environment with Jupyter Lab/Notebook installed idrlab # open Jupyter Lab, idrjup for Jupyter NotebookWarning
Before running the command
idrlabto open a Jupyter Lab session (oridrjupfor Jupyter Notebook), you must load an environment with Jupyter Lab/Notebook installed (see here). -
In a local machine that has access to a web browser, configure a SOCKS proxy
Method 1: Manually
Tip
With the manual method, you will have to switch back the proxy parameters of your web browser to the default settings when you do not use Jean Zay Jupyter Lab/Notebook. To prevent this, you may choose a web browser that you never use.
Warning
We explain here with Firefox, but it is the same principle with Chrome.
Open Firefox (or another web browser) and configure the SOCKS proxy. Go to
Preferences > General > Network Settingsand click onSettings.... TheConnection Settingswindow will appear. SelectManual proxy configurationand define:SOCKS Host:127.0.0.1Port:9999
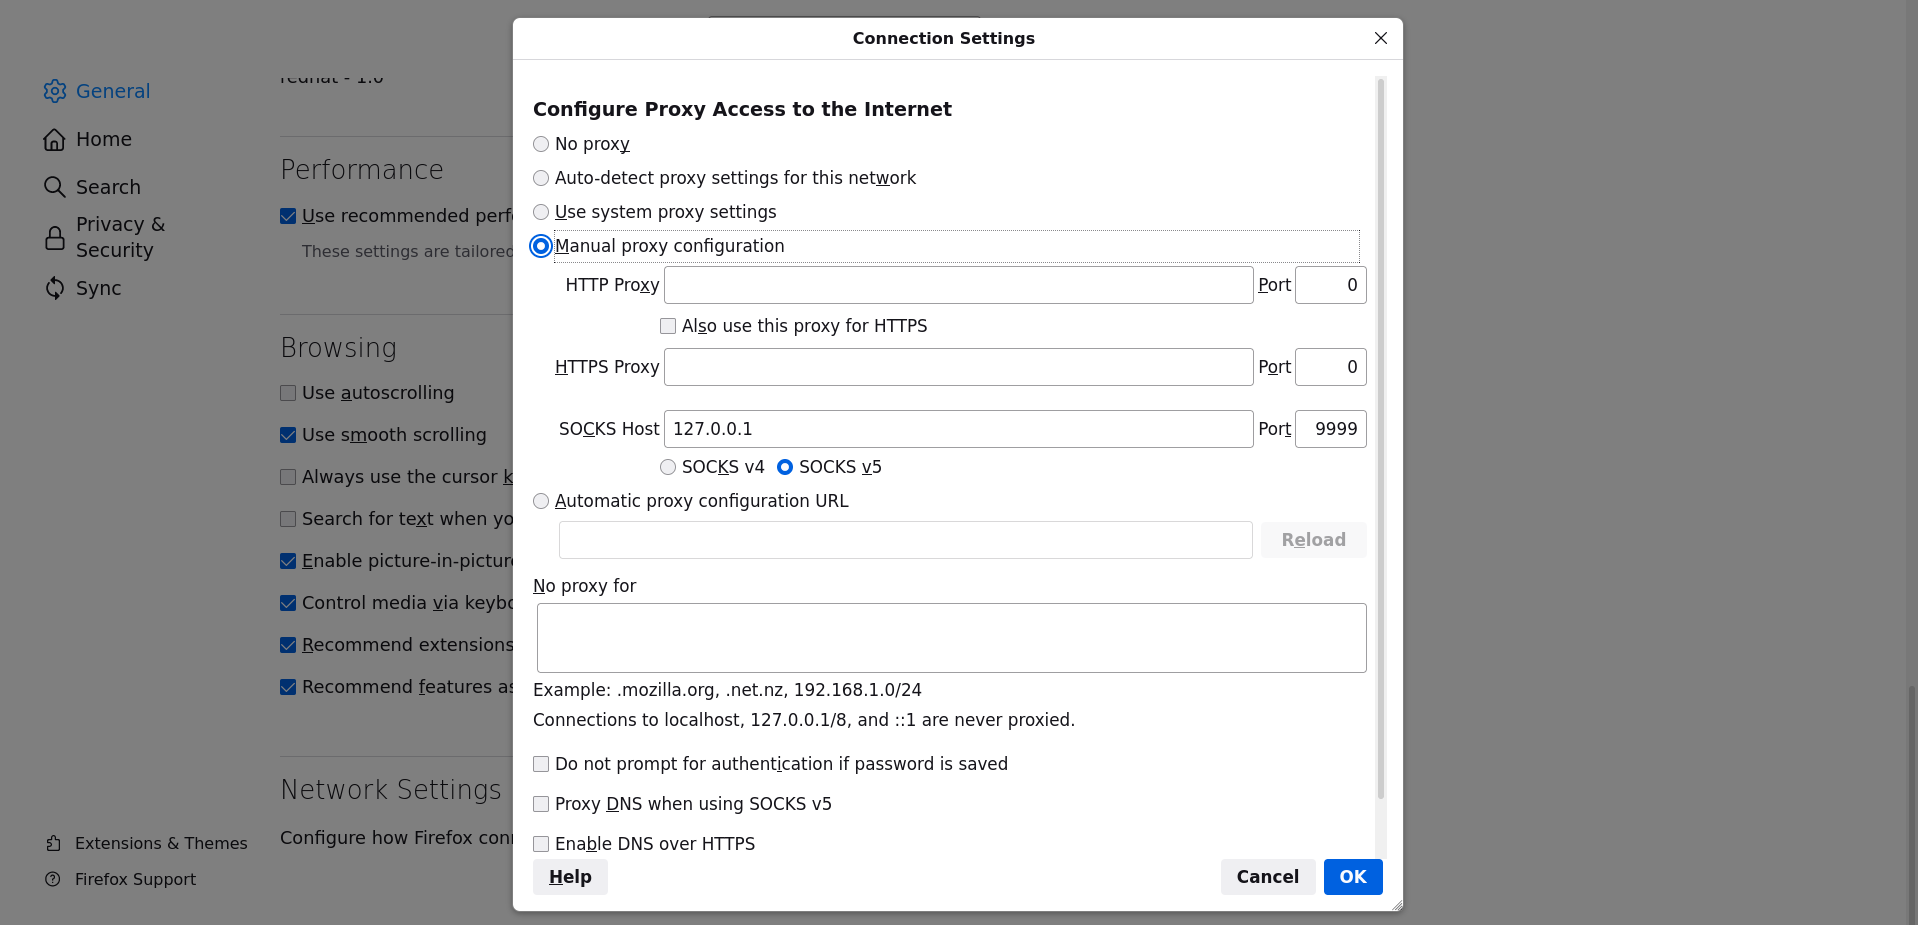
Warning
You can use the port number you want between 1024 and 65535 (both included), as long as you keep the same number when creating a SOCKS proxy server. Here we used
9999.Method 2: Using FoxyProxy extension
Follow the instructions here.
-
In another terminal on your local machine, create a SOCKS proxy server with SSH.
ssh -ND 9999 <your_login>@<registered_machine>Warning
Port number must be the same as the one configured in the web browser (manually or with FoxyProxy). You can use the port number you want between 1024 and 65535 (both included), as long as you keep the same number when configuring the web browser and creating the SOCKS proxy server. Here we used
9999.Warning
<registered_machine>is a machine which IP address has been registered on your Jean Zay account. You can use the proxy machine you used to connect to Jean Zay and open the Jupyter Lab/Notebook session.Warning
If the error
Address already in useappear, change port number (between 1024 and 65535 (both included). Be careful to also change the port number in the proxy [configuration]. -
On your local machine, on the web browser with the SOCKS proxy configured, copy/paste the Jupyter URL obtained in the first terminal. An identification page should be displayed. Then follow the rest of the procedure explained here to authentify yourself.
4. Execution of a GPU code
Job scheduling system is managed by Slurm (same as the one in HAL cluster).
4.1 Submitting a job
- See this page to familiarize yourself with job manager and partitions on Jean Zay, and here for more information on Jean Zay partitions.
- See this page for a single-GPU job.
4.2 Interactive job
See this page.
5. Dataset
Many voluminous public datasets (CIFAR-10, COCO...) are made available in a storage space at Jean Zay, for all users to use (see list).