SSH key
On IPSL computing and data centre, ssh remote login is only allowed with SSH Key (password method is disabled).
- ED25519 key is the new preferred key type.
- Since 1st of june 2024, RSA keys are not anymore accepted for new account and renewing old keys
- existing RSA(4096bits) key can still be used but you may have problem with recent client (openssh 8.8+).
- DSA keys are not accepted anymore (
ssh-dss ...lines in authorized_keys)
Warning
SSH keys are managed by the IT team. You may not add keys in your authorized_keys file. Any unknown SSH key will be automatically removed.
Info
Access via SSH to head nodes is open worldwide on the internet.
Key authentication over SSH protocol
SSH key authentication is an alternative security method to using passwords, simpler than it sounds.
- This method relies on generating a pair of files known as "SSH key pair". Basically, everything encrypted using one of the file/key can be decoded by the other one.
- One file is called "the public key" and can be seen as simple lock.
- Second file is called "the private key" and can be seen as the corresponding lock key.
-
Once you generated such a key pair on your local machine (e.g. your laptop), we install the public one on the ESPRI clusters as a door lock that can be opened by your "private key" only while establishing a SSH connexion.
- Consequently your private key must be on the computer you want to connect from.
- Your private key need to be secret (as any of your passwords). To do so, your private key should be itself protected with a password or a passphrase (encrypted), which only you know or securely stored in a vault (e.g. Keepass).
-
In the case you forget the password/passphrase or lose your private key, the whole key pair has to be changed in the same way that you loose your home key. Obviously we would like to avoid changing many locks a week, we highly recommend to DUPLICATE your key pair in a safe place:
- Copy on another machine (like another server in your lab, university, etc. which are good choices)
- Private or even public cloud if your key is secured with a password/passphrase (encrypted).
-
Finally, having several locks per door is not necessary which means multiplying the number of key pair per users.
SSH key generation
Generating your keys on Linux or MacOS
- Keep filename by default when generating the keys: just type return for Enter file in which to save the key, this is 30% of the users' problems.
- Always protect your key with a passphrase, and do not forget it: this is 10% of the users' problems. Try keepass.
- Really put your ssh public key in good form in the account creation form, this is 50% of the users' problems.
A private key (identification) can easily be copied from one computer to another.
The best thing is to generate the key on one of your laboratory UNIX/Linux server, then copy the SSH key pair on Linux, MacOS or Windows personal laptop. Thus, you will have a copy of your SSH key pair and you can continue to connect even if you lose or break your laptop.
The following command line generates the SSH key pair:
Full example of keys generation
[user@localhost ~]$ ssh-keygen -t ed25519
Generating public/private ED25519 key pair.
Enter file in which to save the key (/home/user/.ssh/id_ed25519):
Enter passphrase (empty for no passphrase):
Enter same passphrase again:
Your identification has been saved in /home/user/.ssh/id_ed25519
Your public key has been saved in /home/user/.ssh/id_ed25519.pub
The key fingerprint is:
SHA256:MENnGbrKf3MA+qJqq5h1BSPVhqTDVFscU6bEzdP/Vv8 user@localhost
The key's randomart image is:
+--[ED25519 256]--+
|  .o+=*=*+       |
| o o.==B= .      |
|  = +.*  . .     |
|   o o.=    .   .|
|     .o.S    . ..|
|   ..o  .     o .|
|  . +.   .   .  .|
|.+ .... o .     E|
|Boo. ... o       |
+----[SHA256]-----+

[user@localhost ~]$ cat $HOME/.ssh/id_ed25519.pub
ssh-ed25519 AAAAC3NzaC1lZDI1NTE5AAAAICg5Od9aRQ5tsgWAhEqcJnHPHy+MCJwRsXhVCEqhPuGD user@localhost
SSH public key example
This example shows you a SSH public key required when creating an ESPRI account:
Generating your SSH keys on Windows
If you don't have mobaxterm you can download it at : Mobaxterm, choose the portable edition (this version is just one binary and install nothing on your windows computer).
The following procedure explains how to generate your keys using mobaxterm.
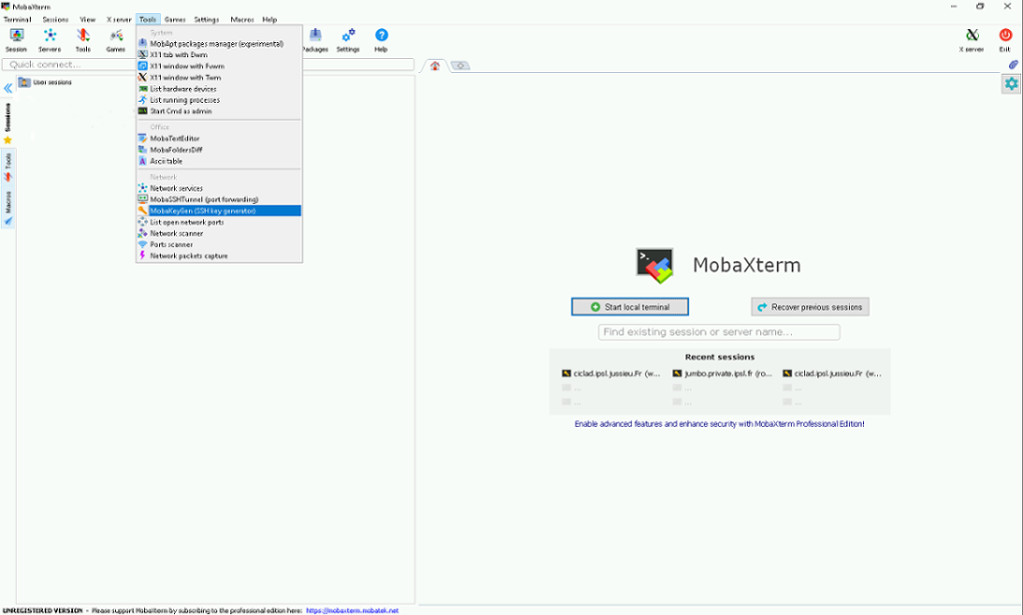
Run mobaxterm application:
- Click on the "tool" menu.
-
Then select mobakeygen item menu.
-
Select EdDSA or ed25519 (depending of mobaxterm version).
- Click on generate then move the mouse as asked (this is important).

At the end you obtain this:

- Protect your key with a passphrase.
- Confirm the passphrase.
- Click on save private key.
- Put on the desktop with name "meso_key"
The SSH public key required for the account creation form is all the text in blue in the window, like the sample just below.
Warning
Do not send your meso_key.ppk file which is the private key
You need now to import your new key in mobaxterm.
Import key in Windows mobaxterm
- Click on Settings.
- Select SSH tab.
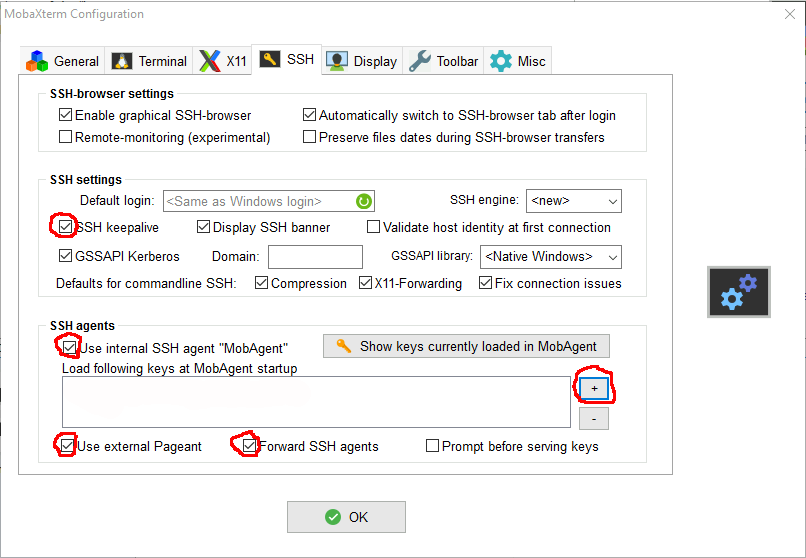
- Activate the 4 options :
- "X" SSH keepalive
- "X" Use Internal SSH Agent
- "X" Use External Pageant
- "X" Forward Agent
- Click on the + sign to import your private key (meso_key ).
- It's also possible to import a key generated on linux or MacOS.
You should have something like this after:
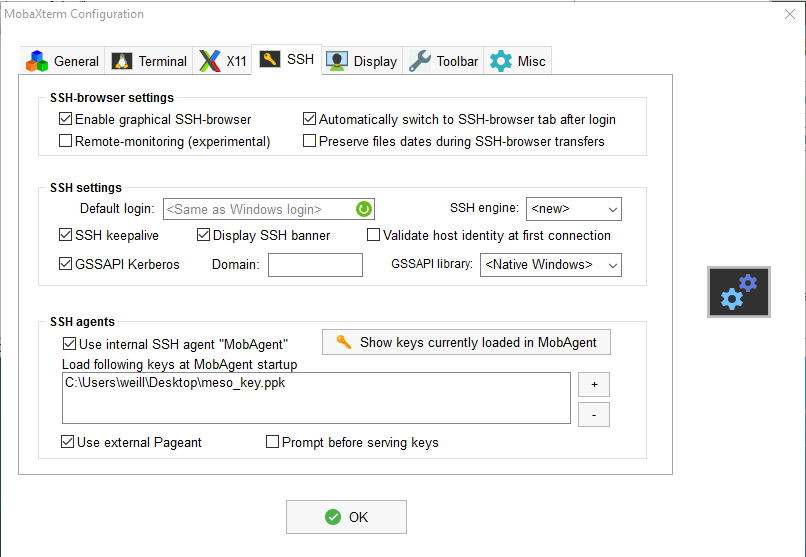
- Click on OK.
- Quit mobaxterm then restart mobaxterm.
You're now ready to test the connection to the ESPRI computing centre if your account is already open.
Permission denied issue
- If you can, Contact your local system administrator or experienced ssh user and show him this documentation.
- for linux/MacOS
- verify you have your key ( the same used for register the account) in $HOME/.ssh directory
- file must be id_ed25519 or id_rsa (if your key has not one of those name,better is to rename but you can also use the ssh -i option to give the name of your private key file )
- unix right for private key must be 600 (chmod 600 $HOME/.ssh/id_*)
- verify you have your key ( the same used for register the account) in $HOME/.ssh directory
- for windows verify you have imported your key inside
- After all verifications over,if it's still non working
- get the following script ssh-debug4suppport.sh
- run the script on your computer with your login on clusters as argument ( For windows run must be made in mobaxterm application ) and follow indication given by the script
bash ./ssh-debug4support.sh replace_by_only_your_login_on_spirit_spiritx_hal
[user@computer ~]$ bash  ./ssh-debug4support.sh replace_by_your_username_on_spirit_spiritx_hal
ssh-debug4support.txt file will be created in the current directory.
on Windows-MobaXterm this file should be on your Desktop
first get help from Your IT laboratory team and if necessary
you have to send this file in attachment to meso-support@ipsl.fr
with subject 'Permission denied debug information'
Keys replication
From Linux/MacOS to Linux/MacOS
You just have to copy the file $HOME/.ssh/id_ed25519 or $HOME/.ssh/id_rsa from YOUR COMPUTER with working connection to YOUR OTHER computer in the $HOME/.ssh/ directory. After the copy, type the following command on YOUR NEW computer:
- for RSA key
- for ed25519 key
from LINUX/MacOS to Windows
We recommand to use Mobaxterm, the portable edition (this version is just one binary and install nothing on your windows computer).
Depending on your operating system:
- On Linux or Mac: you need to copy the file
$HOME/.ssh/id_ed25519or$HOME/.ssh/id_rsa(the private key) from the source computer to your windows computer.
then read the section importing key in Windows mobaxterm
from Windows to Windows
- On Windows: you need a copy of your private key (.ppk) from the source Windows computer.
then read the section importing key in Windows mobaxterm.
From Windows to Linux/MacOS
you need to copy your key (.ppk) from the source windows computer to your linux/MacOS COMPUTER
-
you need to install the putty package on your linux/MacOS
then use puttygen to convert your keyLinux: with your package manager, install PuTTY (or the more minimal PuTTY-tools): Ubuntu: sudo apt-get install putty-tools Debian-like: apt-get install putty-tools RPM based: dnf install putty or yum install putty Gentoo: emerge putty Archlinux: sudo pacman -S putty etc. OS X: Install Homebrew, then run brew install putty -
for ED25519 or EDDSA ppk key :
- for RSA ppk key :
SSH client configuration
With SSH you could create the file $HOME/.ssh/config to simplify some ssh setup, like:
- fix some options.
- fix remote username for one host.
- use host alias.
Host aliases
The following example of config file, defines two aliases: spirit1 and jean-zay. They make the command line shorter to connect you to these cluster head nodes. Thus, ssh <login_ipsl_mesocentre>@spirit1.ipsl.fr is replaced by ssh spirit1. Note that the alias jean-zay reuses the alias spirit1 so as to bounce on the spirit head node before connecting to the jean zay head node (if you have registred spirit1 as your connection machine).
Info
Replace <login_ipsl_mesocentre>, <login_jean_zay> and <path_to_ssh_key> with your own setup.
Host *
  ForwardAgent yes
  ServerAliveInterval=120
  ServerAliveCountMax=90
  XAuthLocation /opt/X11/bin/xauth

Host spirit1
   HostName spirit1.ipsl.fr
   User <login_ipsl_mesocentre> # replace with your own login
   ForwardX11 yes
   IdentityFile <path_to_ssh_key> # replace with your own path, e.g. ~/.ssh/id_rsa
   Port 22

Host jean-zay
   HostName jean-zay.idris.fr
   User <login_jean_zay> # replace with your own login
   IdentityFile <path_to_ssh_key> # replace with your own path, e.g. ~/.ssh/id_rsa
   Port 22
   ProxyCommand ssh spirit1 -W %h:%p # proxy jumping with spirit1